Reaching out to strangers on the Internet for business purposes can be extremely intimidating at times. Setting up your email address, finding quality leads, and drafting the perfect message to send can be time consuming and complex. Whether your goal is to discuss business, promote a product or service, or form a relationship, cold emailing can be incredibly effective when done correctly. This article will cover how to set up an inbox from start to finish for a successful cold email campaign.
Step 1: Maintain A Good Email Reputation
The first step to setting up your email account for a successful cold email campaign is maintaining a good email reputation. Email reputation is a score calculated by the internet service provider and email service provider. Although a complicated metric, we know the factors that we can control when it comes to that calculation; IP reputation, domain reputation, content reputation, and inbox reputation.
IP Reputation
Email service providers check the IP Reputation when deciding where to place the email you have sent. Your IP Reputation is affected by the number of emails sent and whether those emails bounce or end up in the recipient’s spam folder. In order to keep your IP reputation high, be careful of the number of bounces you have and always check the spamminess of your emails before hitting send. By synching with Warmup Inbox, each email you send will be checked for spam-like activity and you’ll be alerted if there are any red flags. If you’d like to do this manually, you can test the spamminess of each email you send here.
Domain Reputation
Domain Reputation can be commonly confused with IP Reputation. The difference is Internet service providers and Email service providers focus on the domain alone, regardless of the IP address history or reputation. Recently, internet service providers have taken domain reputation into account far more than they used to. To achieve and maintain a high domain reputation, work to warm your domain up by sending small quantities of messages to engaging recipients each day and gradually increase the sending volume. The best way to achieve a warm inbox is to use an email warming service such as Warmup Inbox.

Content Reputation
Content Reputation is another important reputation to maintain. When cold emailing, be sure to keep your messages short and to the point with a call to action. Try to avoid using the spam trigger words or including a lot of links because both of these can land you in spam and severely weaken your IP and domain reputation. To be on the safe side, only include a maximum of 1 link per email and keep your message on the shorter side, always under 500 characters. A great way to avoid a bad content reputation is to familiarize yourself with spam trigger words; here is a large list of spam words provided by HubSpot.
A few examples of spam trigger words are:
- $$$
- 4U
- Accept credit cards
- Act now! Don’t hesitate!
- Additional income
- Buy direct
- Cash bonus
- Cannot be combined with any other offers
- Don’t delete
Inbox Reputation
Inbox reputation can be maintained by being selective with your leads and only reaching out to quality leads with buyer intent. Another way to maintain your inbox reputation is to monitor your sending volume, as spammers send out large sums of emails each day. The quality of your message also matters, as we covered above. Lastly, be sure to continuously engage with your inbox, whether that is through warming or conversations each day, the amount of engagement is important.
Step 2: Configure Your Domain’s DKIM , DMARC, and SPF Settings
Configure DKIM
When a user sets up DKIM (Domain Keys Identified Mail), they are applying an encryption signature in the header of each email they send. The encryption helps email servers identify which emails have not been altered after being sent. Here are the steps to set up DKIM in Gmail:
- Generate the domain key for outgoing email
Make sure you have permission to perform the following steps. You must be your accounts administrator to set up DKIM
- Open your Admin Console Home Page
- Choose “Apps”
- Select “Google Workspace”
- Choose “Gmail”
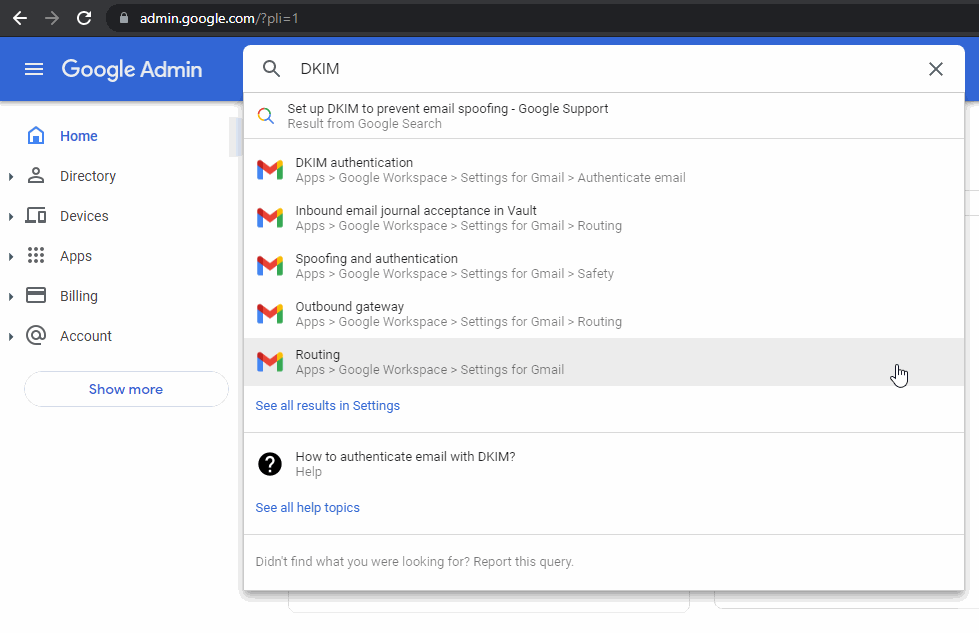
- Choose “Authenticate Email”

- Select which domain you want to use DKIM
- Generate new record
- Select DKIM key bit length
- Prefix selector
- Generate your domain key
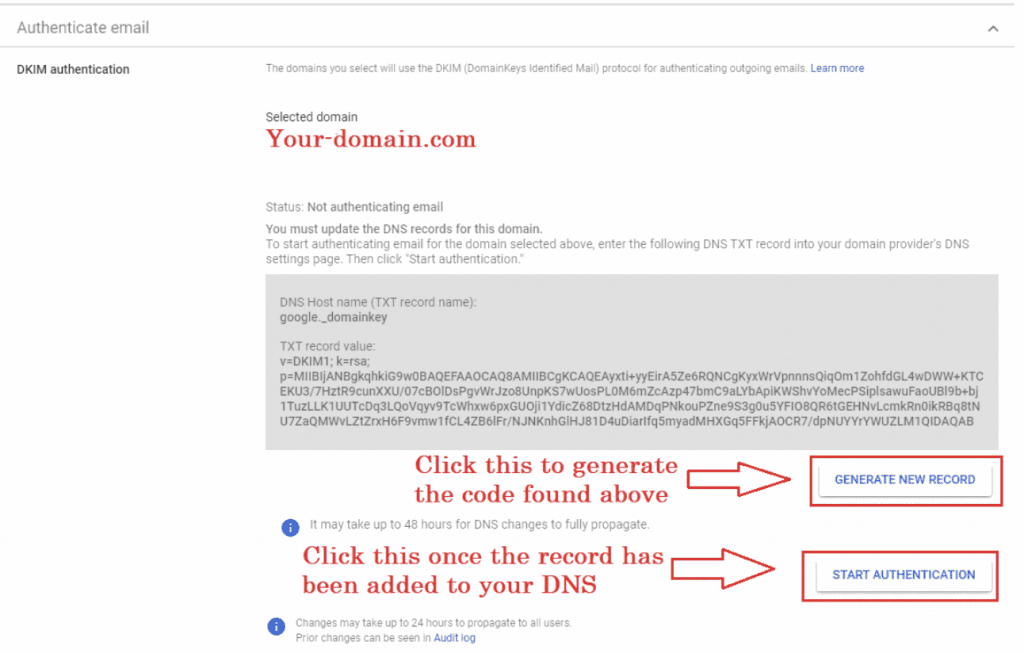
- Add your DKIM key at your domain provider:
- Log on to your domain host management console
- Select “Update DNS record”
- Add “TXT record”
- 1st field: enter the DNS host name
- 2nd field: enter the TXT record value
- Save changes
- Turn on DKIM signing:
- Open your Admin Console Home Page again
- Choose “Apps”
- Select “Google Workspace”
- Choose “Gmail”
- Select “Authentication Email”
- Select domain
- Click “Start authentication”
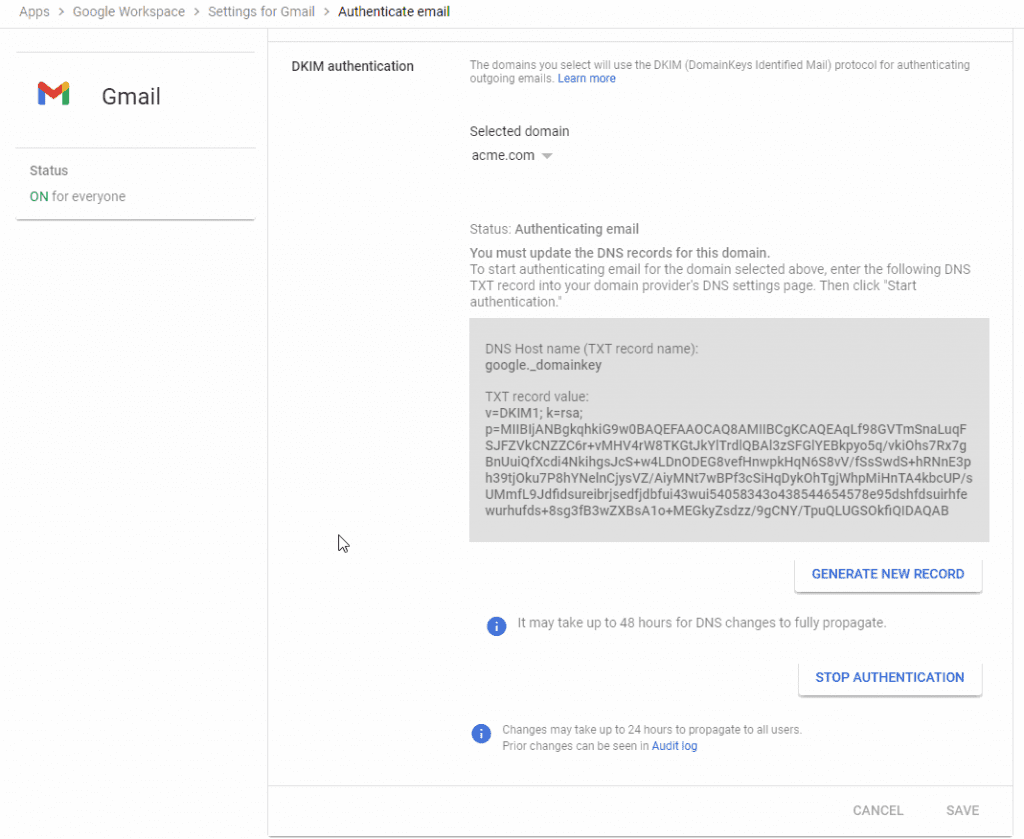
Congratulations, your DKIM has been successfully configured.
Configure SPF
SPF (Sender Policy Framework) also helps to protect your domain from being marked as spam. To properly set up SPF, you will need to add the following record to your DNS settings:
For Google:
Type: TXT Record
Host: @
Value: v=spf1 include:_spf.google.com ~all
TTL: Automatic
For Outlook
Type: TXT Record
Host: @
Value: v=spf1 include:spf.protection.outlook.com -all
TTL: Automatic
How to configure SPF
- Lookup the IP Addresses that are involved in the organization
- Gather all of the domain names in the organization
- Create the SPF record
- Publish the SPF record to DNS
- Test the SPF record
Configure DMARC
You must have SPF and DKIM set up before starting this step. DMARC stands for Domain-based Message Authentication, Reporting, and Conformance. DMARC is a DNS TXT record that should be set up for your domain to control the outcome of your message if it fails to deliver.
How to configure DMARC
- Log in to your DNS Hosting Provider
- Create a new record
- Choose the TXT DNS Record type
- Include the host value
- Include the “value information”
- Create and SAVE
Google: Enter the following record into your DNS settings:
Type: TXT Record
Host: _dmarc.{{Your domain}}
Value: v=DMARC1; p=none; rua=mailto:dmarc-reports@{{Your_Domain}}
TTL: 3600
Microsoft: enter the following record into your DNS settings:
Type: TXT Record
Host: _dmarc.{{Your domain}}
Value: “v=DMARC1; p=none”
TTL: 3600

Step 3: Validate Yourself
Personalization is the name of the game when it comes to cold outreach. Putting the effort in to make your email account personalized will help you gain trust from those you are reaching out to. Two great ways to validate yourself are to make an email signature and add a profile picture.
- Create an email signature to tell your recipients exactly who you are and how they can reach you. Here’s an example:
Name | Job Title
Company Name
P: Work Phone Number
W: Website | E: Work Email Address
- Add a photo to your email account
- Open your account on Gmail
- Click on your initial on the top right corner

- Select “Manage your Google Account “
- Choose “Personal Info”

- Click on profile picture + import your favorite picture of yourself!
- Select “Set”
Step 4: Keep Your Inbox Warm
Properly warming up your inbox before sending a cold outreach campaign is crucial when it comes to success. As we previously mentioned, inbox warming can help with your IP reputation and domain reputation because it increases chances of deliverability and keeps your emails out of your recipient’s spam folders.
In order to send large amounts of emails, you need to slowly ramp up your volume periodically. Email Service Providers set a limit on how many emails can be sent in one day, so it’s very important to use that limit wisely. To prepare to send that many emails, you must be sure that your inbox is properly warmed.
Here are the current sending limits depending on email service provider:
| Email Account | Number of Emails |
| Free Gmail Account | 500 |
| Gmail Workspace | 2,000 |
| Microsoft Office 365 | 10,000 |
| Outlook | 300 |
| Godaddy | 500 |
| Yahoo | 2,400 |
| Comcast | 1,000 |
Inbox warming can take roughly 2 to 3 months to reach the maximum potential, the timing all depends on the email’s engagement level. A user may choose to warm their email on their own, which is completely fine. That process may take longer since there is only so much a user can do each day. Follow these best practices if you choose to manually warm up your inbox:
- Start sending emails to coworkers, friends, or family and have a conversation with them
- You’ll need to engage with about 10-20 different email addresses daily to keep the warming process going
- By having these consistent conversations, the Email service provider can see that your email is productive and authentic, which helps your reputation
- Another great tip is to diversify your sending list when warming is to make sure you are sending to multiple email services, not just Gmail. Try to engage in conversation with other email services such as Yahoo, Ymail, Comcast, AOL, and Godaddy
If you do not want to manually warm up your inbox, you are in luck. There are multiple SaaS (Software as a Service) companies, like Warmup Inbox, that specialize in inbox warming. Most of these companies will simply ask you to sync your email with their platform. Once you do that and pay the monthly subscription fee, your work is finished! Warmup Inbox found a way to automate the process for consumers by flooding their inbox with good emails, building and sending dynamic content, and pulling emails out of the spam folder. Again, the warming process will take between 45-90 days when synced to a platform. Your inbox will be sending and receiving emails all day, while engaging with them to prove credibility.
Step 5: Target Real Prospects Only
As we mentioned earlier, contacting qualified leads is not only good for business, but it’s also great for your reputation.
How to Target Prospects
- Identify your ideal client
- What are you selling?
- Who would be most interested?
- Personalize every single message
- Be sure to do your research when it comes to cold emailing. Recipients are prone to answer more frequently if you make the email tailored to their needs
- Create your cold outreach offer
- Craft your email so the recipient knows that your product can fix the problem they’ve been having
- Create a call to action so they answer your email
- Follow up with the recipient if they do not answer after a week
Where, When, & How to Generate Leads
Now that you’ve identified who you want to reach out to, the next step is to generate that list of leads. A lead is a potential customer who is interested in the product you are promoting. There are ways to cultivate relationships with potential customers organically and then promote your product that way, but the process can be very time consuming and may lead to an unsuccessful cold email outreach campaign.
Where
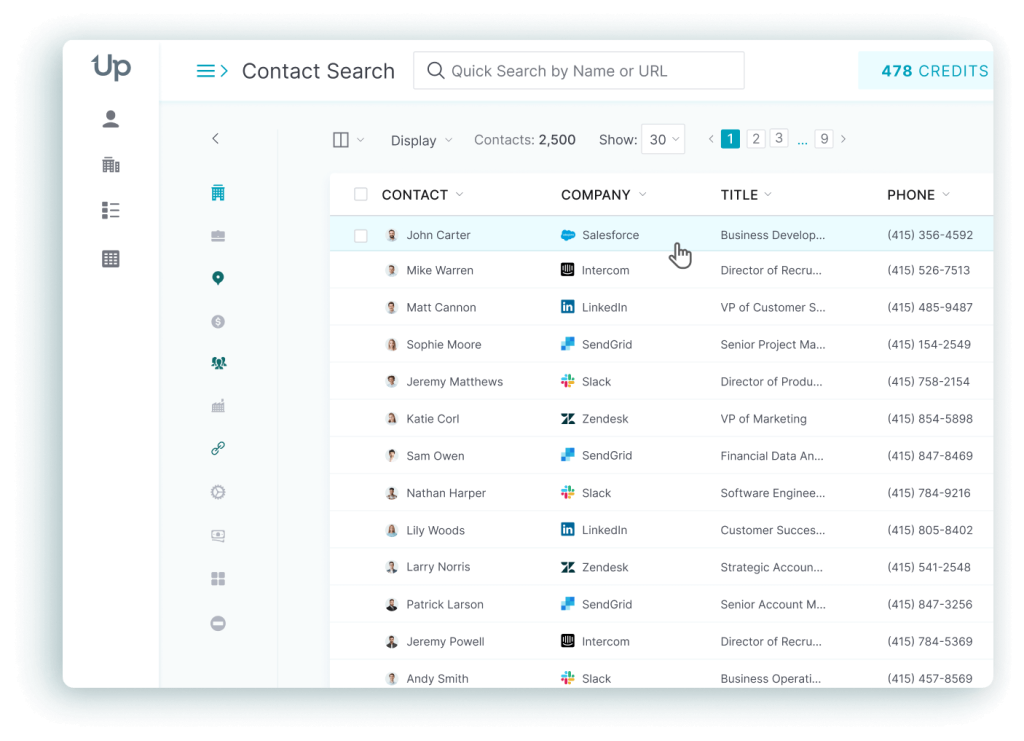
A quicker way to generate leads is through a lead generation agency. You may have a great list of customers, but if your data is old or already used, you may hit a dead end in sales. Lead generation tools, like UpLead, specialize in supplying users with quality leads that will decrease their email bounce rates, increase their open rates, and turn the leads provided into sales.
When
The right time to generate leads is when you have accomplished steps 1 through 4 mentioned above. You must first successfully set up your inbox and properly warm up your inbox before beginning your cold outreach campaign. Once that has been completed, it is time to generate leads.
How
A lot of lead generation agencies make it extremely easy to generate a list of high quality leads to begin your cold outreach campaign. Depending on your lead budget, you can select how many leads you’d like to receive each month. Most of the lead generation tools have a monthly subscription, or even offer a discount for a yearly commitment.

Step 6: Customize & Personalize Your Message
Customizing your cold email outreach message is very important in order to get responses. Including some of the following features can be a great way to capture attention and produce replies that may turn into sales.
- Personalize your email by mentioning a recent accomplishment of the recipient or their company
- Grab their attention with the first sentence
- Get to the point. Keep it short & sweet.
- Provide a solution to their problem
- Flatter them
- Share something valuable
Once you have crafted the perfect, custom, personalized message, you must check your email for any spam words. After all of this work, the last thing you want to do is set off the spam filters and send all of your hard work to the spam folder. As we mentioned earlier, keep your message short, avoid spam words, and include only 1 link.
How to double check the rough draft of your email for spam-like activity:
- Go to a website that will check your spam score. We are using Mail-Tester in this example
- You will be prompted to send your email to a specific email address provided by the website.
- Once you send the email, select “Check your score”

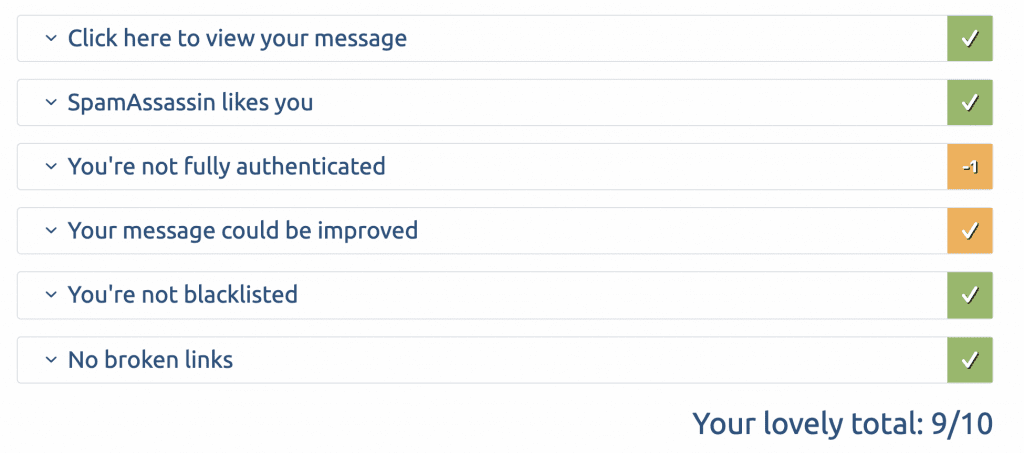
- Your score will appear with a few pointers or suggestions for improvement. This website in particular also checks for blacklists, SpamAssassin rating, and your email authentication
Step 7: Craft A Follow-Up Email
The last step is to craft the perfect follow-up email to hopefully get a response from those who chose not to reply to or even open your first email. According to Campaign Monitor, an email campaign’s open rate is 15%-25%. This means if you bought a list of 400 high quality leads from a lead generation agency, you may only receive 80 or fewer responses. Sending a follow-up email may be your saving grace when it comes to tallying up more responses.
We recommend waiting 3 days before sending a follow-up email. Most emails that are sent are opened on the same day, so odds are the recipient is just not interested. Sending a follow-up email may spark their interest or encourage them that they need the product after all.
How to Write a Follow Up Email
First you’ll want to remind your recipient why you are reaching out to them. You could say something like:
- Hello, I sent you an email on Tuesday of last week regarding [product/company]
- Good Morning, I just wanted to follow up with you to see if you were interested in [product/company]. I sent you an email a few days ago.
- Good Afternoon, I hope this email finds you well. I saw that you opened my email regarding [product/company] and wanted to ask if you had any questions for me?
The second thing you’ll want to focus on is what you can offer them. So they did not respond to your first email, but maybe they will respond if you can provide some sort of value? You could include something along the lines of:
- If you are interested, I’d love to offer you a 25% discount off of your first order.
- I will include an addition [product] with your order
- We noticed you’re having trouble with [problem], our professionals have a few tips for you to improve it.
Next, explain why you’re emailing them again. Reiterate how your product can help their problem or whatever the case may be. Be sure to include a call to action similar to:
- Are you willing to jump on a call next week? Here’s my availability (insert your calendar)
- If I’m emailing the wrong person about this, can you please point me in the right direction?
- Simply reply “Yes” and I will send you all of the information
Lastly, finish your email strong with a kind and personal closing. Ask them for their opinion, thoughts, or if they have any questions. Wish them a good day and hit SEND!
Conclusion
As we mentioned before, cold email outreach can be extremely intimidating at first. Preparing for an email campaign takes a lot of time and dedication. It would be a shame to put in all of that effort just for the email to end up in the recipient’s spam folder. Be sure to follow these best practices to ensure delivery of every email. By doing so, you will pave the way for a successful cold email campaign.